How to import students from a spreadsheet
Bring your school's existing student list into StriveBit ERP in a single CSV upload, instead of typing hundreds of records in one at a time.
What you'll do
- 1Open Students and choose Import.
- 2Download the CSV template so your columns match exactly.
- 3Fill the template from your existing register or Excel sheet.
- 4Upload the file and fix anything flagged in the preview.
- 5Confirm the import and spot-check a few students.
Most schools arrive with their student list already in Excel, a Tally export, or a register someone has been maintaining for years. You don't need to retype any of it. The import screen takes a CSV file and creates every student in one pass.
Budget about ten minutes for a single class, and most of that is tidying the spreadsheet rather than using the software.
Before you start
You need an account with permission to create students — usually the school admin.
You do not have to create your classes first. If a row names a class that doesn't exist yet, the importer creates it, as long as the name is in a format it recognises. Setting classes up beforehand is still worth doing, because a class created during an import has no class teacher or subjects attached, and because a class name it can't parse leaves that student with no class at all.
Step 1 — Download the template
Go to Students and click Import CSV — the screen is titled Bulk Import
Students. Click Download Template. You'll get a file called
student_import_template.csv with one example row already filled in.
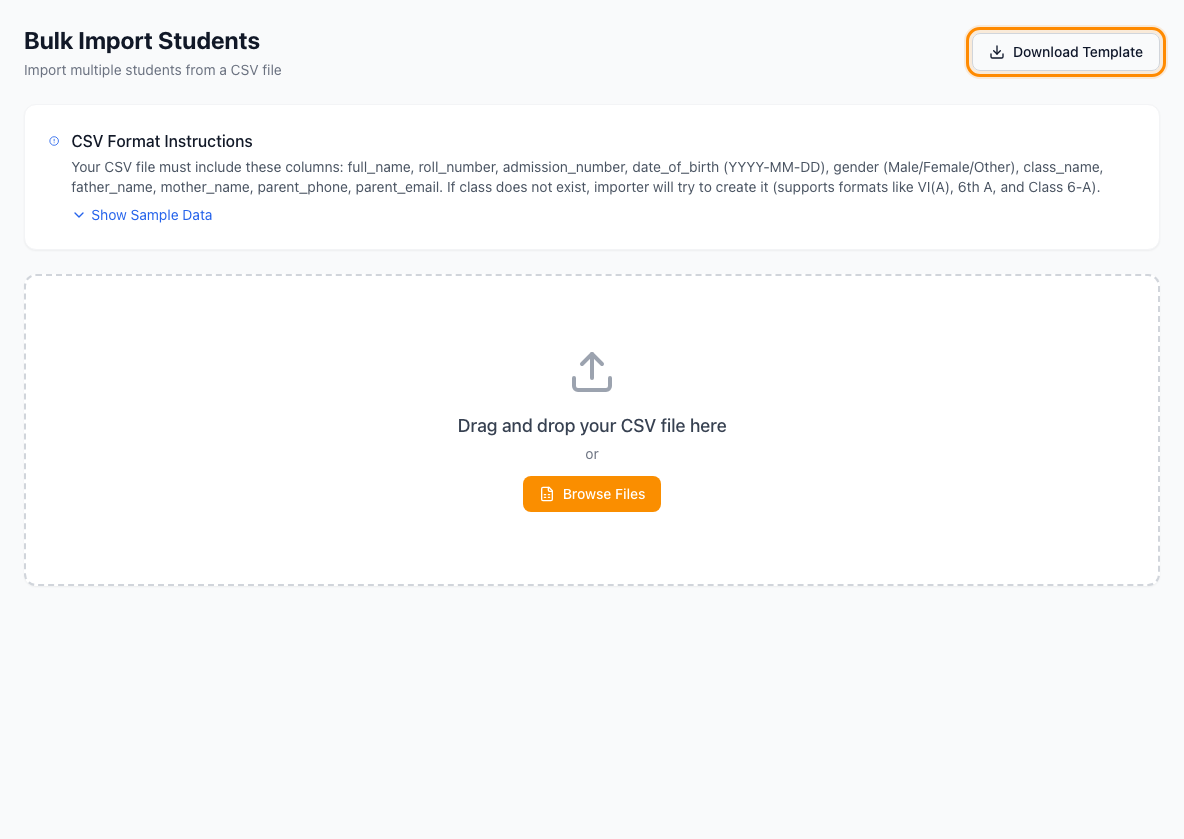
Use this file as your starting point. The importer matches columns by their exact header name, so a spreadsheet with different column names — or the right names in a different order — is the most common reason an import fails.
The ten columns are:
| Column | Example | Required |
|---|---|---|
full_name |
John Doe | Yes |
roll_number |
001 | No |
admission_number |
ADM2024001 | No |
date_of_birth |
2010-05-15 | No |
gender |
Male | No |
class_name |
Class 5-A | Yes |
father_name |
John Doe Sr. | No |
mother_name |
Jane Doe | No |
parent_phone |
9876543210 | No |
parent_email |
parent@example.com | No |
Step 2 — Fill in your students
Copy your existing data into the template, one student per row. A few rules worth knowing before you paste 300 rows in:
Class names are flexible. The importer understands several formats, so you usually don't need to reformat what your school already writes:
Class 5-A6th AVI(A)6 A
Gender must be exactly Male, Female or Other if you fill it in at all.
M, F, or male in lower case will be flagged. You can also leave the column
empty.
Dates go in YYYY-MM-DD format — 2010-05-15, not 15/05/2010.
Only full_name and class_name are genuinely required. Everything else can be
blank and filled in later from the student's record. If you don't have admission
numbers yet, leave that column empty rather than inventing placeholders.
Tip: if a parent phone number appears on several rows because siblings share it, that's fine — it doesn't create duplicate parents. Linking parents to students is a separate step you do after the import.
Step 3 — Upload the file
Back on the Bulk Import Students screen, drag your CSV onto the upload area, or click Browse Files. Only .csv files are accepted — if you're working in Excel, use
File → Save As → CSV first.
The file is read in your browser and checked immediately. Nothing is saved yet.
Step 4 — Review and fix errors
If anything is wrong, you'll see a list of problems with the row number and the column for each one, like:
Row 14 — gender: Gender must be Male, Female, or Other
Row 27 — full_name: Full name is required
Row numbers match your spreadsheet, counting the header as row 1, so row 14 in the error list is row 14 in Excel. Fix them in your spreadsheet, save, and upload again.
When the file is clean you'll see a preview of the first ten students with a count of the total. Check that the class column looks right — this is where a mis-typed class name shows up most obviously.
Step 5 — Run the import
Click Import Students. They're created in small batches, with a progress indicator, so a few hundred students take a moment rather than freezing the page.
When it finishes you'll see how many were created out of how many were in the file. If those two numbers differ, the difference is rows that failed — re-check them rather than re-uploading the whole file, which would create duplicates.
After the import
Two things are usually worth doing next:
- Spot-check a few students in the Students list — especially the first and last rows of your file, and anyone with an unusual name or class.
- Create parent logins. Importing students doesn't create parent accounts. That's done from Parent Logins, which can link a parent to their child automatically by admission number — one more reason to fill that column in if you have it.
Common problems
"Nothing imported and every row errored." Almost always the column headers. Open the template and your file side by side and compare the first row exactly — a trailing space or a renamed column breaks the match.
A class you didn't expect appeared. The importer creates any class it doesn't
recognise, so a typo like Class 5-A with a trailing space, or 5A written two
different ways, produces a second class. Check Classes afterwards and merge or delete
anything unintended.
Students imported with no class at all. The class name couldn't be parsed into a
class and section, so the student was created unassigned. Recognised formats are
Class 5-A, 6th A, VI(A) and 6 A — anything else needs fixing and re-importing
for those rows.
Duplicate students after a second attempt. Re-uploading a whole file after a partial import creates the successful rows again. Delete the duplicates from the Students list, and re-import only the rows that failed.
Features covered
Student Records
The master record for every student — personal, family, contact and address details, admission number and photo — searchable by class. Add students one at a time or import a whole class from a CSV spreadsheet, and promote an entire class to the next grade in bulk at year-end, carrying electives over if you choose. A student's profile shows the electives they take.
Classes & Sections
Create every class and section the school runs. Each class has its own page: how many students it has, attendance today, fees due and a short list of what needs attention, with tabs for its students, its subjects (teacher, counts towards the percentage, language slot, elective on or off) and its electives. Links on the page open the class's timetable, homework, lesson plans, teacher assignments, fee dues and attendance report already filtered to it. For a subject only some students take, choose who takes it there, student by student. For people who can see exams, an Exams tab lists each exam the class is in with how far marks entry has got (sheets filled, overdue marks flagged, pass percentage once published) and links to the class's marks, results and report cards.
Parent Logins
Create a login for each parent, individually or from a spreadsheet — a parent can be linked to their child automatically by admission number during import.
Want us to set this up with you?
Data migration and staff training are included on every plan.
Talk to us